
Announcement
지난 포스트 Akka 공부하기 - 01.액터(Actors)와 액터시스템(ActorSystem)에 이어지는 내용입니다.
이 포스트는 github.com/petabridge/akka-bootcamp/tree/master/src/Unit-1/lesson2를 번역한 글입니다. 혹시 오역이 있다면 피드백 바랍니다.
Intro
이번 시간에는 고유의 메세지 타입을 만들고, 커스텀 메세지를 기반으로 액터 내에서 처리 흐름(processing flow)을 제어하는 방법을 배워보겠습니다. 또한, 액터 시스템에서 메시지 및 이벤트 기반 방식의 커뮤니케이팅 기본을 알려드릴 것입니다.
지난 포스팅에서 작성했던 콘솔 액터 시스템을 계속 확장해가며 진행할 것입니다. 우리는 우리가 사용할 메세지를 정의하는 것뿐만 아니라, 간단한 입력 검증과 검증의 결과에 따라 취해질 액션 또한 추가할 것입니다.
Key concepts / background
메세지(message) 란?
모든 POCO는 메세지가 될 수 있습니다. 메세지는 string이나, int와 같은 value, 인터페이스를 구현하는 오브젝트 등 당신이 원하는 뭐든지 될 수 있습니다.
그렇지만, 당신의 커스텀 메세지를 의미 있는 이름의 클래스로 만들고, 원하는 상태를 클래스 안에 캡슐화하는 방법을 추천합니다.
(e.g. ValidationFailed 클래스 내부에 Reason을 저장.. 오늘 실습 힌트입니다)
액터(actor)에게 메세지를 보내려면 어떻게 하죠?
지난 시간에 잠깐 봤습니다. Tell()을 이용해서 보낼 수 있습니다.
메세지를 어떻게 처리(handle)하죠?
이것은 전적으로 당신에게 달려있습니다. 그리고 사실 Akka.NET과 그다지 연관이 없습니다. 당신의 액터 내 선택에 따라 처리할 수도, 처리하지 않을 수도 있습니다.
내 액터가 처리하는 법을 모르는 메세지를 받으면 어떻게 되죠?
액터는 처리하는 법을 모르는 메세지는 무시합니다. 무시된 메세지는 액터의 종류에 따라 로깅 되기도 합니다.
UntypedActor에서는, 처리되지 않은 메세지를 수동으로 Unhandled()하지 않는 이상 로깅되지 않습니다. 예:
class MyActor : UntypedActor
{
    protected override void OnReceive(object message)
    {
         if (message is Messages.InputError)
        {
            var msg = message as Messages.InputError;
            Console.ForegroundColor = ConsoleColor.Red;
            Console.WriteLine(msg.Reason);
        }
        else
        {
            Unhandled(message);
        }
    }
}
그렇지만, ReceiveActor(나중에 2장에서 다룰 것입니다)에서는 처리되지 않은 메세지는 자동으로 Unhandled로 보내고 로깅이 수행됩니다.
내 액터가 메세지에 어떻게 반응해야 하죠?
당신에게 달려있습니다. 당신은 간단히 메세지를 처리하거나, Sender에게 응답하거나, 다른 액터에게 전달하거나, 아무것도 안 하고 끝낼 수 있습니다.
실습
이번 실습에서는, 우리의 시스템에 유효성 검사를 추가할 것입니다. 상용자의 입력을 검사하고, 커스텀 메세지 타입을 사용해서 검증 결과를 다시 사용자에게 알려줄 것입니다.
NOTE: 액터가 메세지를 받았을 때는 항상 액터 내부의
Sender속성을 통해 현재 메세지 발신자의 참조를 가지고 있습니다.
1단계: 메세지 타입 정의
Messages.cs 파일을 추가하고, Messages 클래스를 만듭니다.
이 클래스는 이벤트를 알리는 것에 사용할 시스템 레벨 메세지(system-level messages)를 정의하는데 이용할 것입니다. 우리는 이벤트를 메세지로 바꾸는 패턴을 사용할 것입니다. 즉, 이벤트가 발생하면, 그것에 대해 알아야 할 필요가 있는 액터(들)에게 적절한 메세지 클래스를 보낼 것이고, 그리고 수신하는 액터 측에서 필요에 따라 메세지를 듣고 응답할 것입니다.
각 메세지 타입에 따라 region을 추가합니다.
파일에 3개의 각기 다른 메세지 타입을 위한 region을 추가합니다. 다음으로, 우리는 이벤트를 알리는 것에 사용할 메세지 클래스를 만들 것입니다.
// in Messages.cs
#region Neutral/system messages
#endregion

#region Success messages
#endregion

#region Error messages
#endregion
우리는 regions 안에 다음과 같은 상황을 알리기 위한 커스텀 메세지 타입을 정의할 것입니다:
- 상용자가 비어있는(blank) 입력을 한 경우
- 사용자가 잘못된 입력을 한 경우
- 사용자가 올바른 입력을 한 경우
ContinueProcessing 메세지를 만듭니다.
#region Neutral/system messages 안에 마커 메세지 클래스를 정의합니다. 이는 처리를 계속하라고 신호를 보내는 것에 사용합니다. (비어있는 입력 케이스):
// in Messages.cs
#region Neutral/system messages
/// <summary>
/// Marker class to continue processing.
/// </summary>
public class ContinueProcessing { }
#endregion
InputSuccess 메세지를 만듭니다.
#region Success messages 안에 InputSuccess 클래스를 정의합니다. 우리는 이것을 사용자의 입력이 올바르고 검증을 통과할 때 보낼 신호로 사용할 것입니다. (올바른 입력 케이스) :
#region Success messages
// in Messages.cs
/// <summary>
/// Base class for signalling that user input was valid.
/// </summary>
public class InputSuccess
{
    public InputSuccess(string reason)
    {
        Reason = reason;
    }

    public string Reason { get; private set; }
}
#endregion
InputError 메세지를 만듭니다.
#region Error messages 안에 InputError 클래스를 정의합니다. 우리는 이것을 잘못된 입력이 발생했을 때 보낼 신호로 사용할 것입니다. (잘못된 입력 케이스):
// in Messages.cs
#region Error messages
/// <summary>
/// Base class for signalling that user input was invalid.
/// </summary>
public class InputError
{
    public InputError(string reason)
    {
        Reason = reason;
    }

    public string Reason { get; private set; }
}

/// <summary>
/// User provided blank input.
/// </summary>
public class NullInputError : InputError
{
    public NullInputError(string reason) : base(reason) { }
}

/// <summary>
/// User provided invalid input (currently, input w/ odd # chars)
/// </summary>
public class ValidationError : InputError
{
    public ValidationError(string reason) : base(reason) { }
}
#endregion
NOTE: 완성된 예제 Message.cs를 보고 제대로 작성했는지 확인하실 수 있습니다.
2단계: 이벤트를 메세지로 변환 및 전송
잘했습니다! 우리는 이벤트를 감싸고(wrap) 있는 메세지를 만들었습니다. 이제 ConsoleReaderActor와 ConsoleWriterActor에서 사용해봅시다.
ConsoleReaderActor를 수정하세요.
ConsoleReaderActor에 내부 메세지 타입을 추가해주세요:
// in ConsoleReaderActor
public const string StartCommand = "start";
Main 메서드에서 ConsoleReaderActor.StartCommand을 사용하도록 수정합니다.
수정 전:
// in Program.cs
// tell console reader to begin
consoleReaderActor.Tell("start");
수정 후:
// in Program.cs
// tell console reader to begin
consoleReaderActor.Tell(ConsoleReaderActor.StartCommand);
ConsoleReaderActor의 OnReceive 메서드를 다음과 같이 수정해주세요. 이제 우리는 이제 우리의 커스텀 InputError 메세지를 듣고(listening), 에러가 발생하면 적절한 조치를 한다는 점을 주목해주세요.
// in ConsoleReaderActor
protected override void OnReceive(object message)
{
    if (message.Equals(StartCommand))
    {
        DoPrintInstructions();
    }
    else if (message is Messages.InputError)
    {
        _consoleWriterActor.Tell(message as Messages.InputError);
    }

    GetAndValidateInput();
}
그리고 ConsoleReaderActor에 DoPrintInstructions(), GetAndValidateInput(), IsValid()도 추가합니다. 이것들은 ConsoleReaderActor이 콘솔에서 입력을 받고 입력이 유효한지 검증할 때 사용할 내부 메서드입니다. (현재, 검증은 단지 입력한 문자열이 짝수개인지 확인합니다.)
// in ConsoleReaderActor, after OnReceive()
#region Internal methods
private void DoPrintInstructions()
{
    Console.WriteLine("Write whatever you want into the console!");
    Console.WriteLine("Some entries will pass validation, and some won't...\n\n");
    Console.WriteLine("Type 'exit' to quit this application at any time.\n");
}

/// <summary>
/// Reads input from console, validates it, then signals appropriate response
/// (continue processing, error, success, etc.).
/// </summary>
private void GetAndValidateInput()
{
    var message = Console.ReadLine();
    if (string.IsNullOrEmpty(message))
    {
        // signal that the user needs to supply an input, as previously
        // received input was blank
        Self.Tell(new Messages.NullInputError("No input received."));
    }
    else if (String.Equals(message, ExitCommand, StringComparison.OrdinalIgnoreCase))
    {
        // shut down the entire actor system (allows the process to exit)
        Context.System.Terminate();
    }
    else
    {
        var valid = IsValid(message);
        if (valid)
        {
            _consoleWriterActor.Tell(new Messages.InputSuccess("Thank you!
             Message was valid."));

            // continue reading messages from console
            Self.Tell(new Messages.ContinueProcessing());
        }
        else
        {
        	Self.Tell(new Messages.ValidationError("Invalid: input had
            odd number of characters."));
        }
    }
}

/// <summary>
/// Validates <see cref="message"/>.
/// Currently says messages are valid if contain even number of characters.
/// </summary>
/// <param name="message"></param>
/// <returns></returns>
private static bool IsValid(string message)
{
    var valid = message.Length % 2 == 0;
    return valid;
}
#endregion
Program을 수정합니다.
첫 번째로, Program.cs에서 PrintInstructions()을 제거합니다. 그리고, ConsoleReaderActor에 만족스럽게 정의된 StartCommand가 있으므로 message 안에 하드코딩된 “start” 문자열 대신 이것을 사용합니다.
작업이 완료되면 Main()은 다음과 같아야 합니다:
static void Main(string[] args)
{
    // initialize MyActorSystem
    MyActorSystem = ActorSystem.Create("MyActorSystem");

    var consoleWriterActor = MyActorSystem.ActorOf(Props.Create(() =>
    new ConsoleWriterActor()));
    var consoleReaderActor = MyActorSystem.ActorOf(Props.Create(() =>
    new ConsoleReaderActor(consoleWriterActor)));

    // tell console reader to begin
    consoleReaderActor.Tell(ConsoleReaderActor.StartCommand);

    // blocks the main thread from exiting until the actor system is shut down
    MyActorSystem.WhenTerminated.Wait();
}
약간의 정리 외에 크게 바뀌지는 않았습니다.
ConsoleWriterActor를 수정합니다.
이제, ConsoleWriterActor가 새로운 메세지 타입들을 처리하게 합시다.
ConsoleWriterActor의 OnReceive 메서드를 다음과 같이 바꿉니다:
// in ConsoleWriterActor.cs
protected override void OnReceive(object message)
{
    if (message is Messages.InputError)
    {
        var msg = message as Messages.InputError;
        Console.ForegroundColor = ConsoleColor.Red;
        Console.WriteLine(msg.Reason);
    }
    else if (message is Messages.InputSuccess)
    {
        var msg = message as Messages.InputSuccess;
        Console.ForegroundColor = ConsoleColor.Green;
        Console.WriteLine(msg.Reason);
    }
    else
    {
        Console.WriteLine(message);
    }

    Console.ResetColor();
}
보시는 바와 같이, ConsoleWriterActor에서 수신한 메세지의 타입을 검사하고,
어떤 메세지 타입을 수신했냐에 따라 다른 처리를 하도록 만들었습니다.
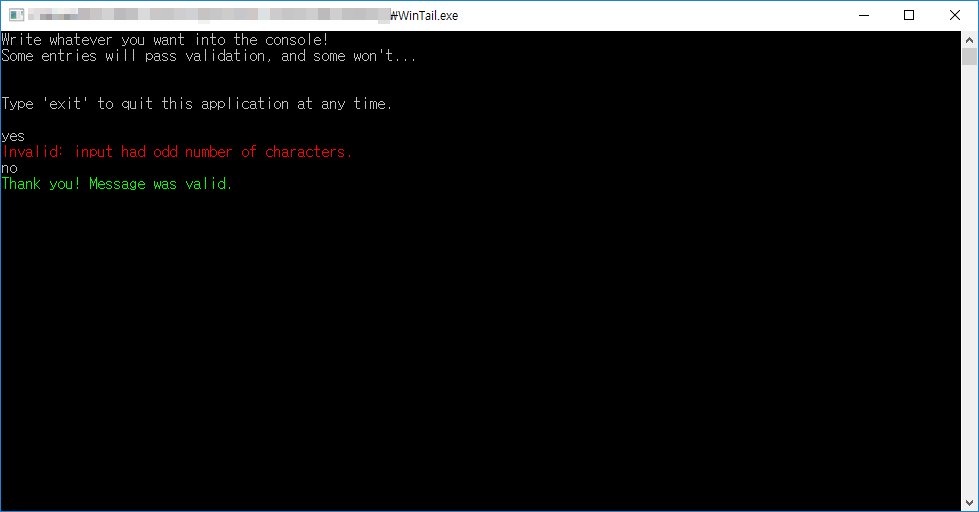
3단계: Build and Run!
이제 빌드하고 실행하기 위한 모든 준비가 되었으면, 시도해봅시다!
화면이 다음과 같이 나타날 경우, 정상적으로 작동하는 것입니다:
모든 과정이 끝났을 경우,
작성한 코드와 Complated의 코드를 비교하며 샘플에 어떤 것이 추가되었는지 확인해봅시다.
수고하셨습니다! 레슨3 차례입니다.
레슨2를 무사히 끝냈습니다. 레슨3를 향해 나아가봅시다.
Akka 공부하기 - 01.3 Props와 and IActorRef