Intro
기존 포스트 맥용 메뉴 바 앱 개발하기 - 00. 팝오버 생성와 이어지는 내용입니다. 단순 기술참고만 하려면 상관없으나, 예제 코드 등 내용이 이전 포스트와 이어지므로, 기존 포스트를 먼저 읽는 것을 추천드립니다.
이전 포스트에서 메뉴 바에 아이콘을 만들고 popover를 띄우는 것 까지 진행했습니다.
우리는 완성 했을 때 다음과 같이 lsof 명령어를 활용해 LISTENING 상태로 열려있는 포트 리스트를 화면에 띄우는 앱을 만들 것입니다.
UI 요소 추가
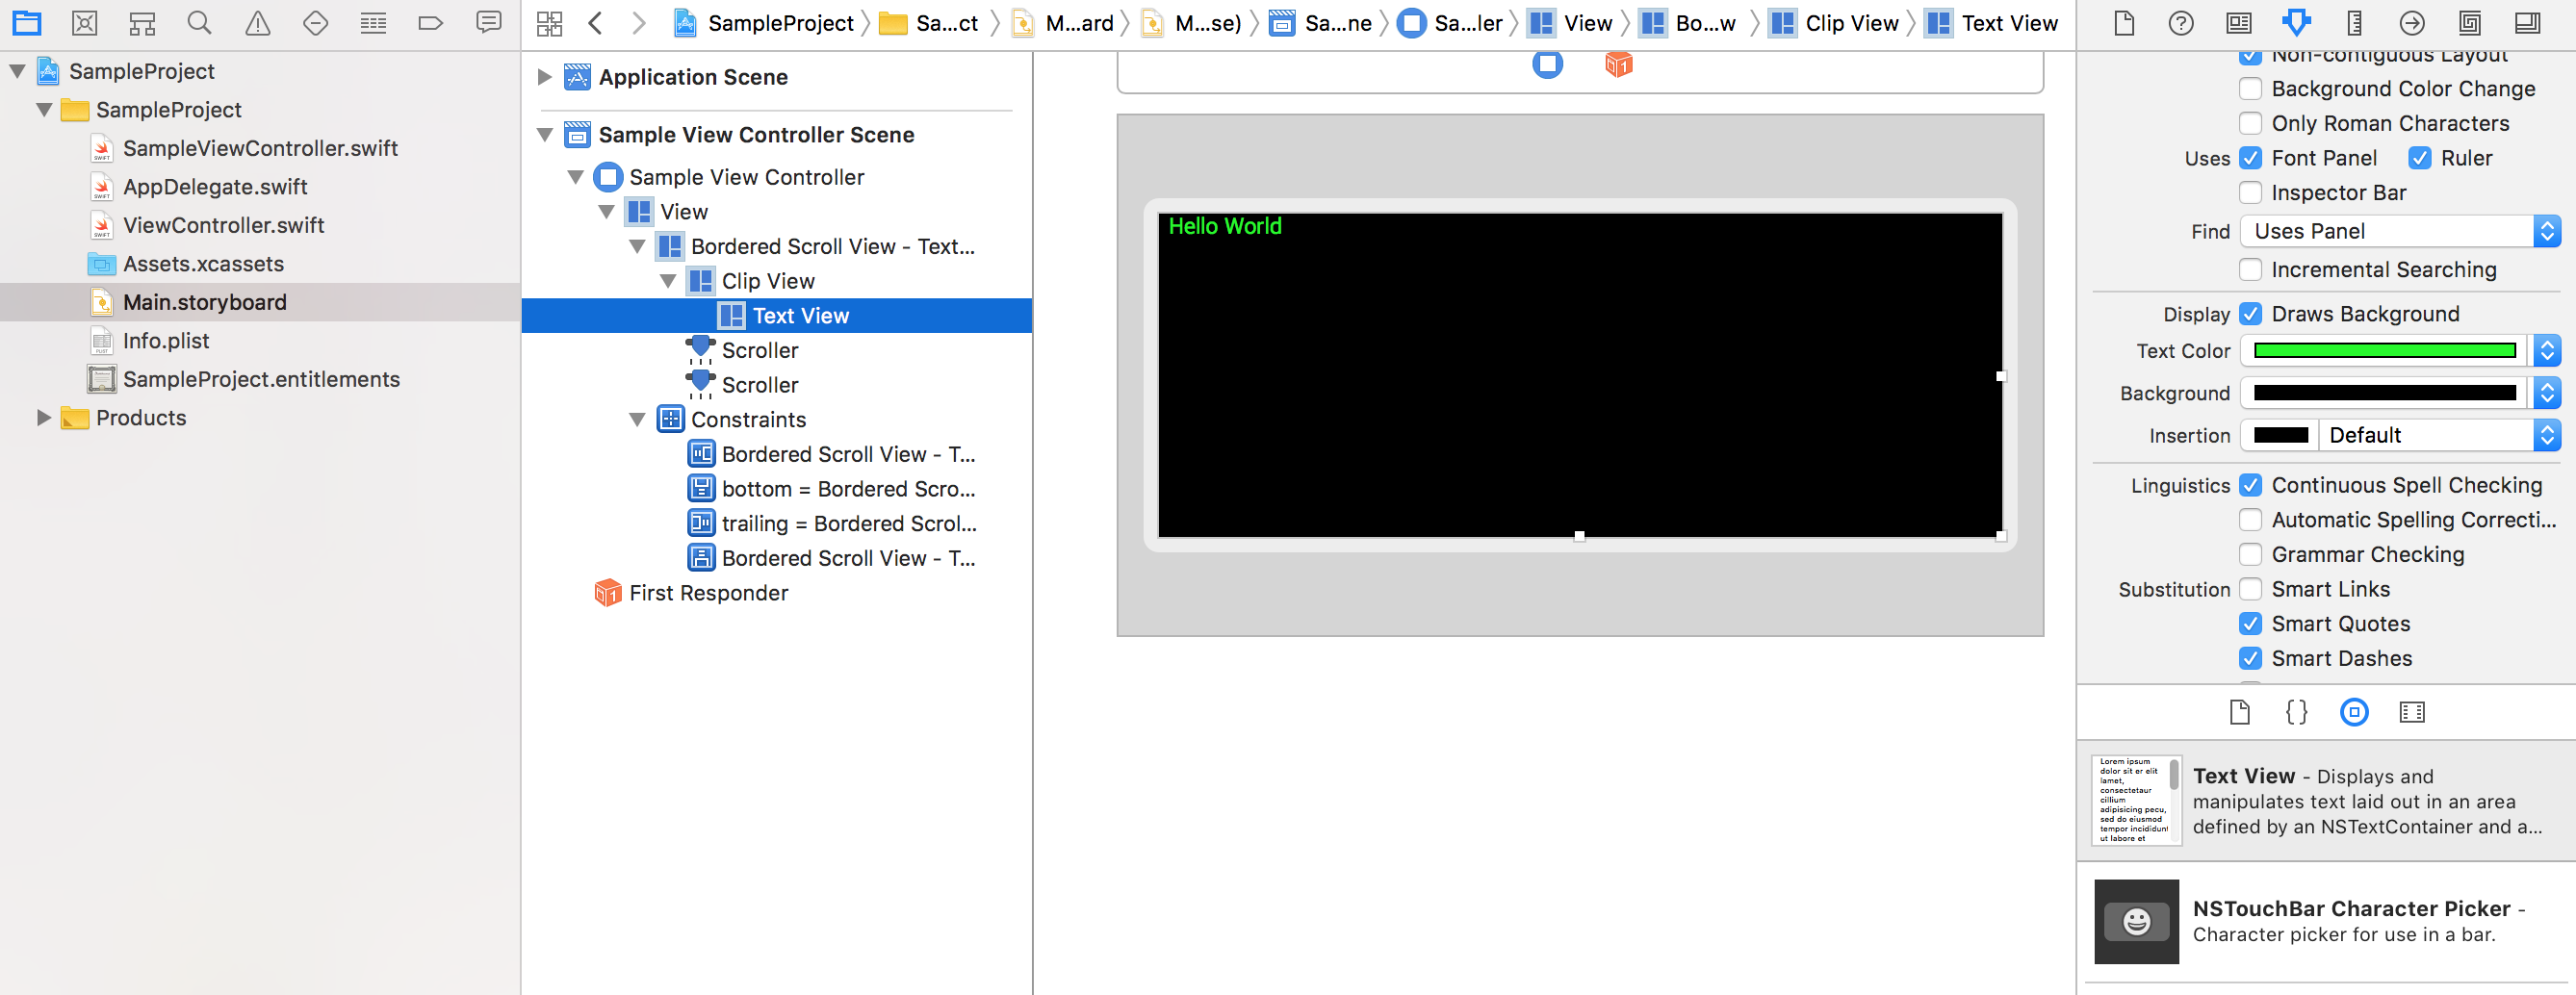
먼저, 스토리보드에서 Text View를 뷰 컨트롤러에 추가합니다. 배치나 디자인은 꼭 똑같이 하지 않아도 됩니다. 본인이 원하는 스타일대로 해보세요. 저는 옛날 창 느낌이 좋아 배경은 검은색, 글자는 녹색으로 했습니다. 참고로 Text View를 추가하면, Scroll View - Clip View - Text View 구성으로 추가됩니다.
Text View의 배경색, 글자색을 바꾸려면 Text View를 선택 후 수정해야 합니다.

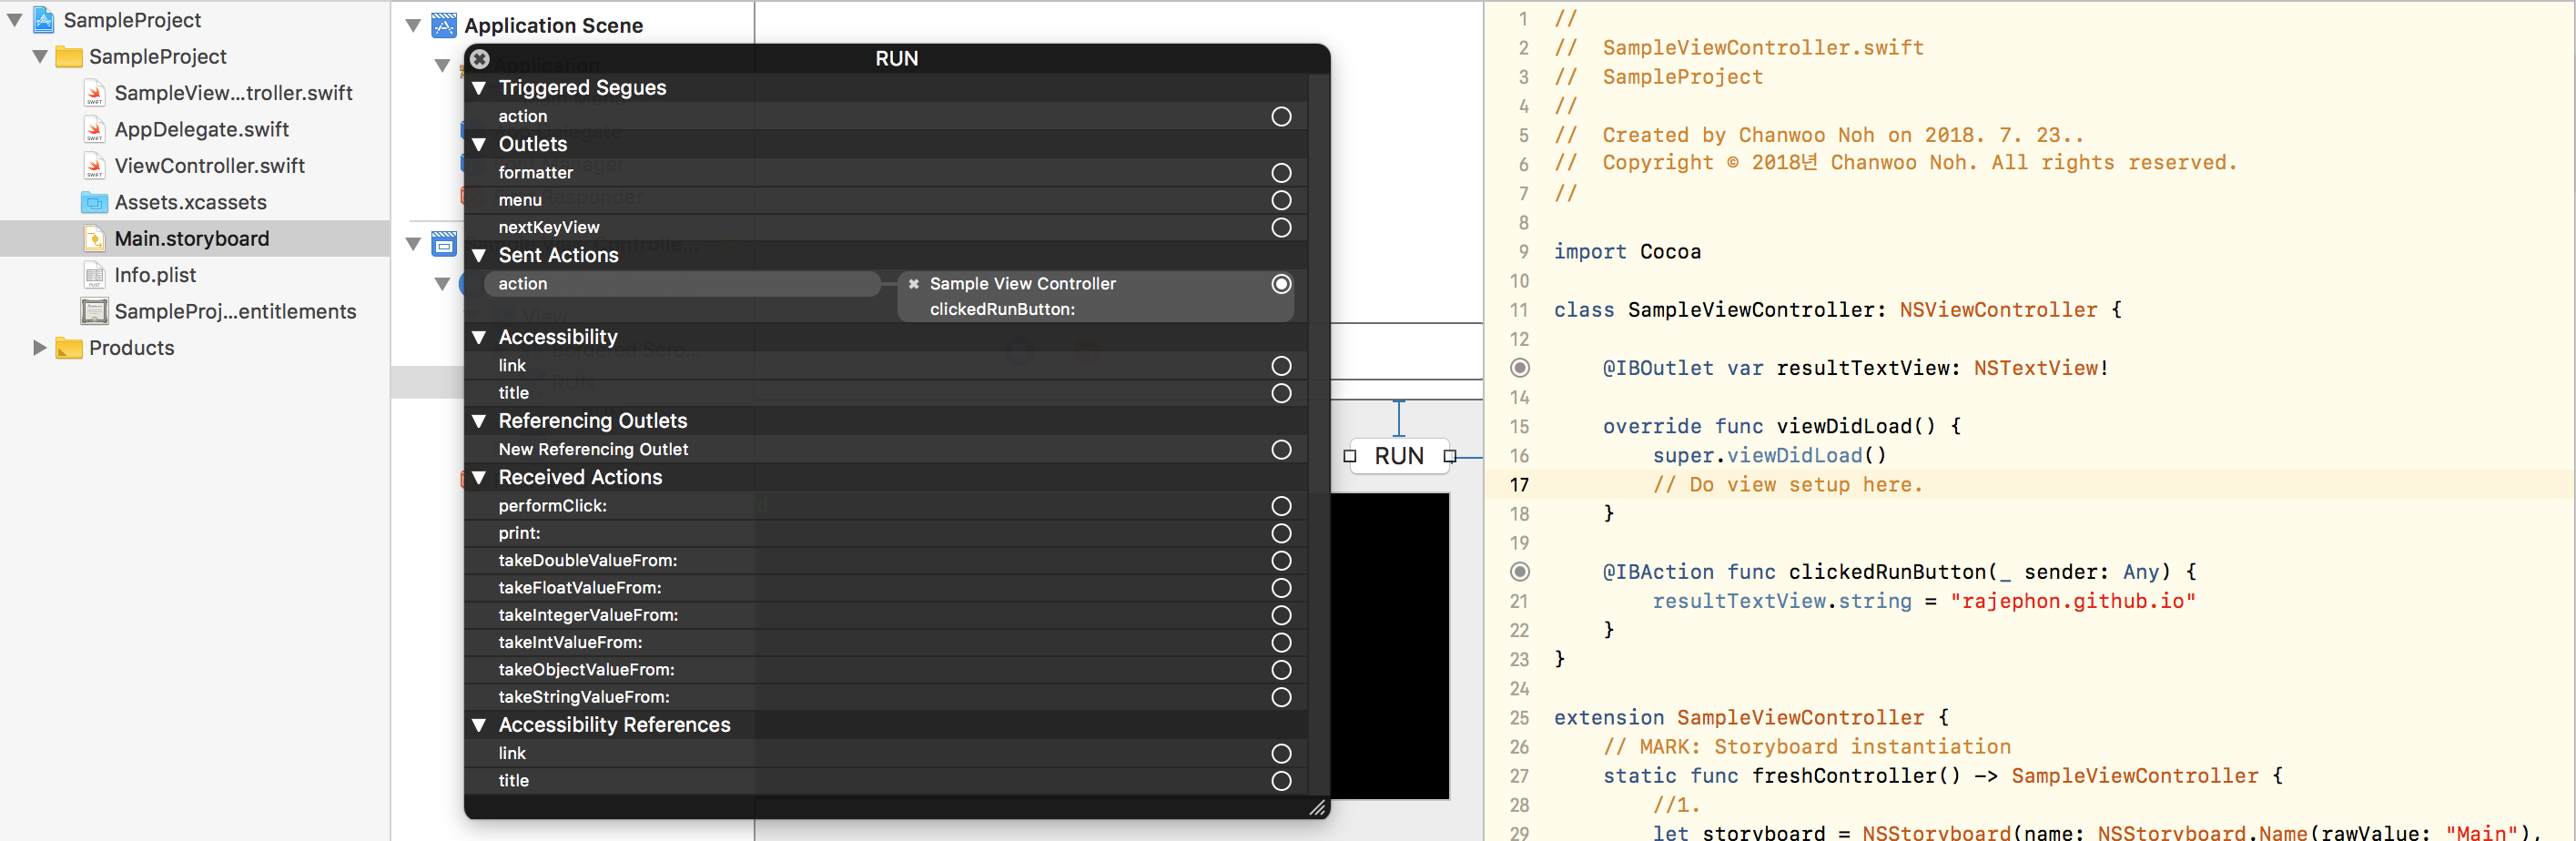
그리고 만든 TextView를 코드에서 이용할 수 있도록 아울렛을 연결해봅니다. 이 포스트를 읽는 분들은 다들 할 줄 아실 것이라 생각합니다. 하지만, 아울렛 연결이 익숙치 않은 분들을 위해 아울렛 연결의 다양한 방법 중 한 가지를 기술해두겠습니다.
먼저, Main.storyboard를 새 창에 띄웁니다. Assistant editor를 사용해도 되고 두 개의 창을 볼 수 있는 본인이 편한 방법대로 하면 됩니다. 그리고 한 쪽에는 popover view와 연결된 뷰 컨트롤러의 스위프트 코드를 열어주세요. 저는 SampleViewController.swift이기에 이것을 띄웠습니다.
다음, Text View를 우클릭합니다. Scroll View가 아닌 Text View가 선택되도록 Outline View각 Scene의 하위 요소 리스트가 나열된 화면에서 Text View를 찾아 우클릭 합니다. 검은색 창에 여러 리스트가 나타날 것입니다. 그 중에 New Referencing Outlet이 있습니다. 우측의 원(O)을 꾹 누른 채 override func viewDidLoad() 위의 공백으로 드래그 해주세요. 그리고 나타난 창에 이름을 정해주세요. 저는 명령어의 결과를 표시할 예정이므로 resultTextView로 했습니다.
그러면 UI요소가 IBOutlet 변수로 연결됩니다. SampleViewController의 모습은 다음과 같이 됩니다.
class SampleViewController: NSViewController {

    @IBOutlet var resultTextView: NSTextView!

    override func viewDidLoad() {
        super.viewDidLoad()
        // Do view setup here.
    }
}
마찬가지로, 누르면 lsof 명령어가 수행 될 버튼을 추가해봅시다. 버튼은 직접적인 UI요소를 조작하는 것이 아닌 동작(클릭)의 이벤트에 따라 동작해야 하므로, actions를 정의하면 됩니다. 메소드 이름은 clickedRunButton(_:)로 정의했습니다.
class SampleViewController: NSViewController {

    @IBOutlet var resultTextView: NSTextView!

    override func viewDidLoad() {
        super.viewDidLoad()
        // Do view setup here.
    }

    @IBAction func clickedRunButton(_ sender: Any) {

    }
}
clickedRunButton(_:)에 다음 한 줄을 추가해서, 버튼을 눌렀을 때 텍스트뷰에 글씨가 출력되는지 동작 테스트를 해봅시다.
    @IBAction func clickedRunButton(_ sender: Any) {
        resultTextView.string = "rajephon.github.io"
    }
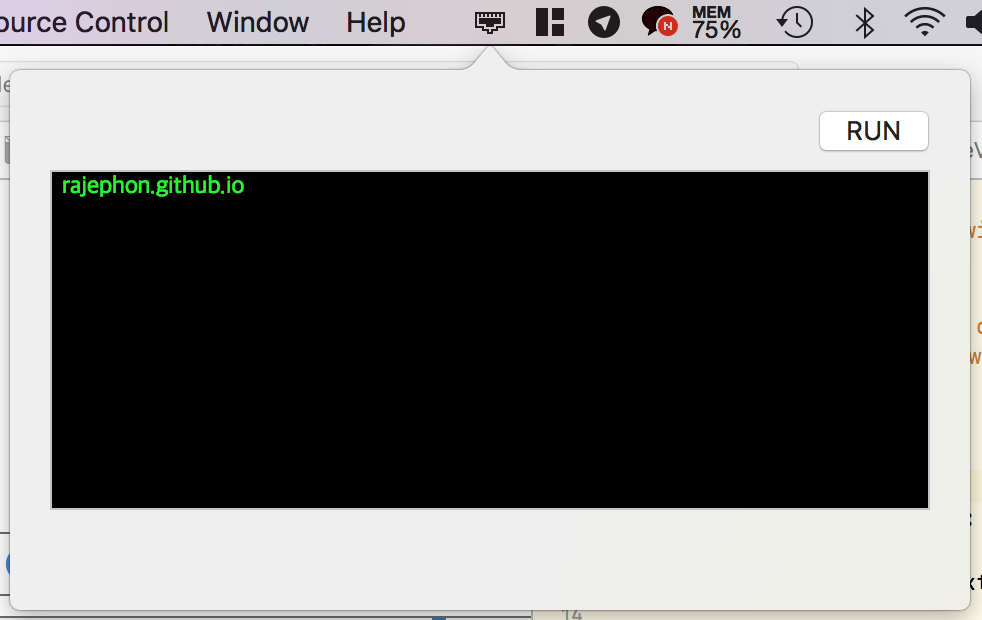
버튼을 눌렀을 때 다음과 같이 텍스트 뷰의 문구가 바뀌면 여기까지는 성공입니다.
권한상승요청
이제, 커맨드를 실행시키고 그 결과를 텍스트 뷰에 출력하는 작업을 수행해야 합니다.
lsof를 수행할 때 sudo권한 없이 수행하면 사용자가 본인인 서비스 리스트만 출력됩니다. 그럴경우 root권한 없이 열 수 없는 Well-known port 범위에 해당하는 대다수의 포트 리스트를 볼 수 없습니다. 그러므로 권한 상승 요청을 구현해야 합니다. 다행스럽게도 애플에서 작성한 샘플코드도 존재하고, github에 기능이 구현된 라이브러리도 있습니다. 저는 suolapeikko의 PrivilegedTaskRunner를 참고했습니다.
어플리케이션 구동 시 HelperDaemon을 install하고, 필요할 때 권한을 요청하고 NSXPCConnection을 이용해 Helper에서 커맨드를 수행합니다. 이를 위해서는 Helper를 위한 타겟이 필요합니다. Xcode 프로젝트에서 File - New - Target...을 눌러 새로운 타겟을 생성합니다. macOS - Application의 Command Line Tool을 선택해주세요. 프로젝트 이름은 SamplePrivilegedTaskRunnerHelper로 했습니다.
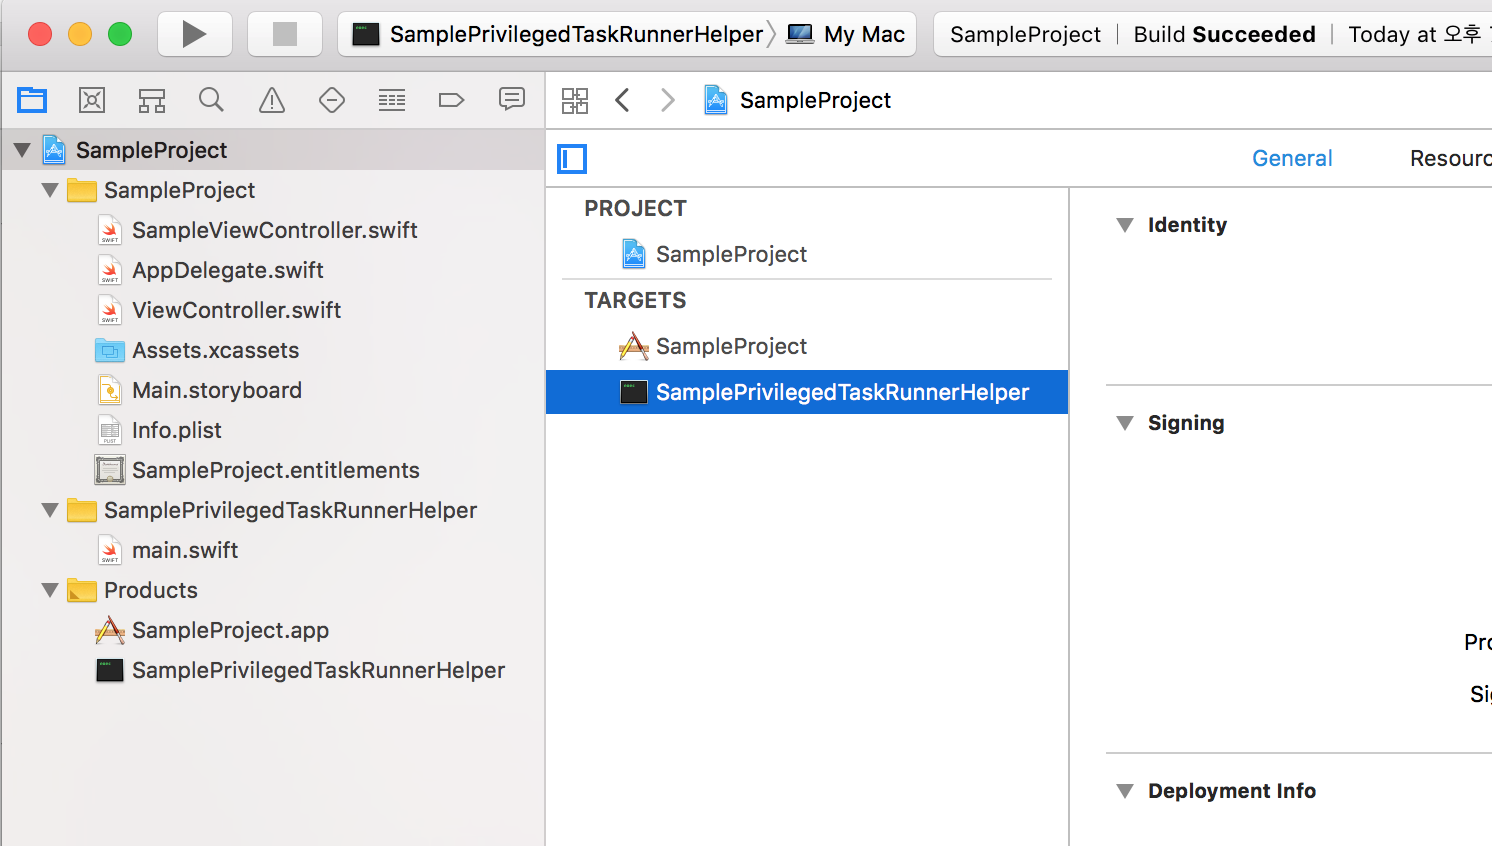
여기까지 잘 따라오셨으면, Xcode 프로젝트는 다음과 같은 모습입니다.
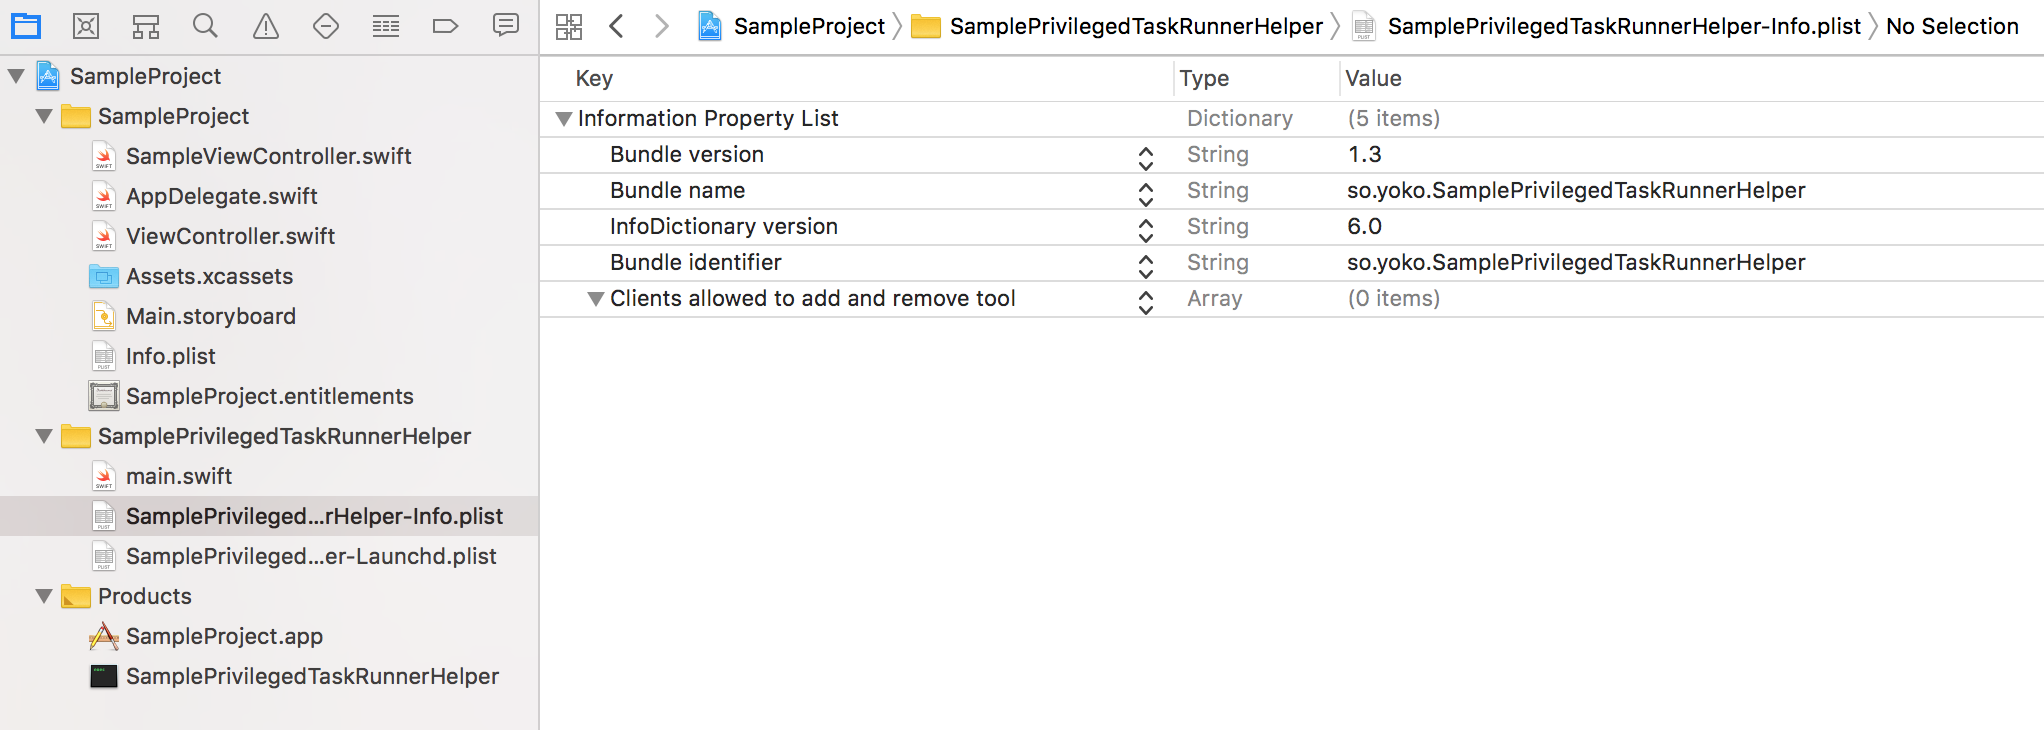
그리고, 2개의 plist파일을 생성합니다. SamplePrivilegedTaskRunnerHelper-Info.plist와 SamplePrivilegedTaskRunnerHelper-Launchd.plist입니다.
SamplePrivilegedTaskRunnerHelper 디렉토리를 오른쪽 클릭 - New File...을 선택하고, Resource - Property List를 선택 후 Next를 눌러주세요. 파일 위치는 가능한 한 기본 그대로 해주세요. SamplePrivilegedTaskRunnerHelper 디렉토리 일겁니다. 파일 이름은 SamplePrivilegedTaskRunnerHelper-Info.plist로 해주세요. SamplePrivilegedTaskRunnerHelper-Launchd.plist또한 똑같은 방법으로 생성합니다.
<?xml version="1.0" encoding="UTF-8"?>
<!DOCTYPE plist PUBLIC "-//Apple//DTD PLIST 1.0//EN" "http://www.apple.com/DTDs/PropertyList-1.0.dtd">
<plist version="1.0">
<dict>
	<key>CFBundleVersion</key>
	<string>1.3</string>
	<key>CFBundleName</key>
	<string>so.yoko.SamplePrivilegedTaskRunnerHelper</string>
	<key>CFBundleInfoDictionaryVersion</key>
	<string>6.0</string>
	<key>CFBundleIdentifier</key>
	<string>so.yoko.SamplePrivilegedTaskRunnerHelper</string>
	<key>SMAuthorizedClients</key>
	<array/>
</dict>
</plist>
-Info.plist입니다. CFBundleName, CFBundleIdentifier는 본인이 지정한 Bundle Identifier에 알맞게 수정해주세요.
CFBundleVersion또한 본인이 임의로 지정합니다. 이후 수정한 버전이 더 높은 숫차를 가지도록만 하면 됩니다.
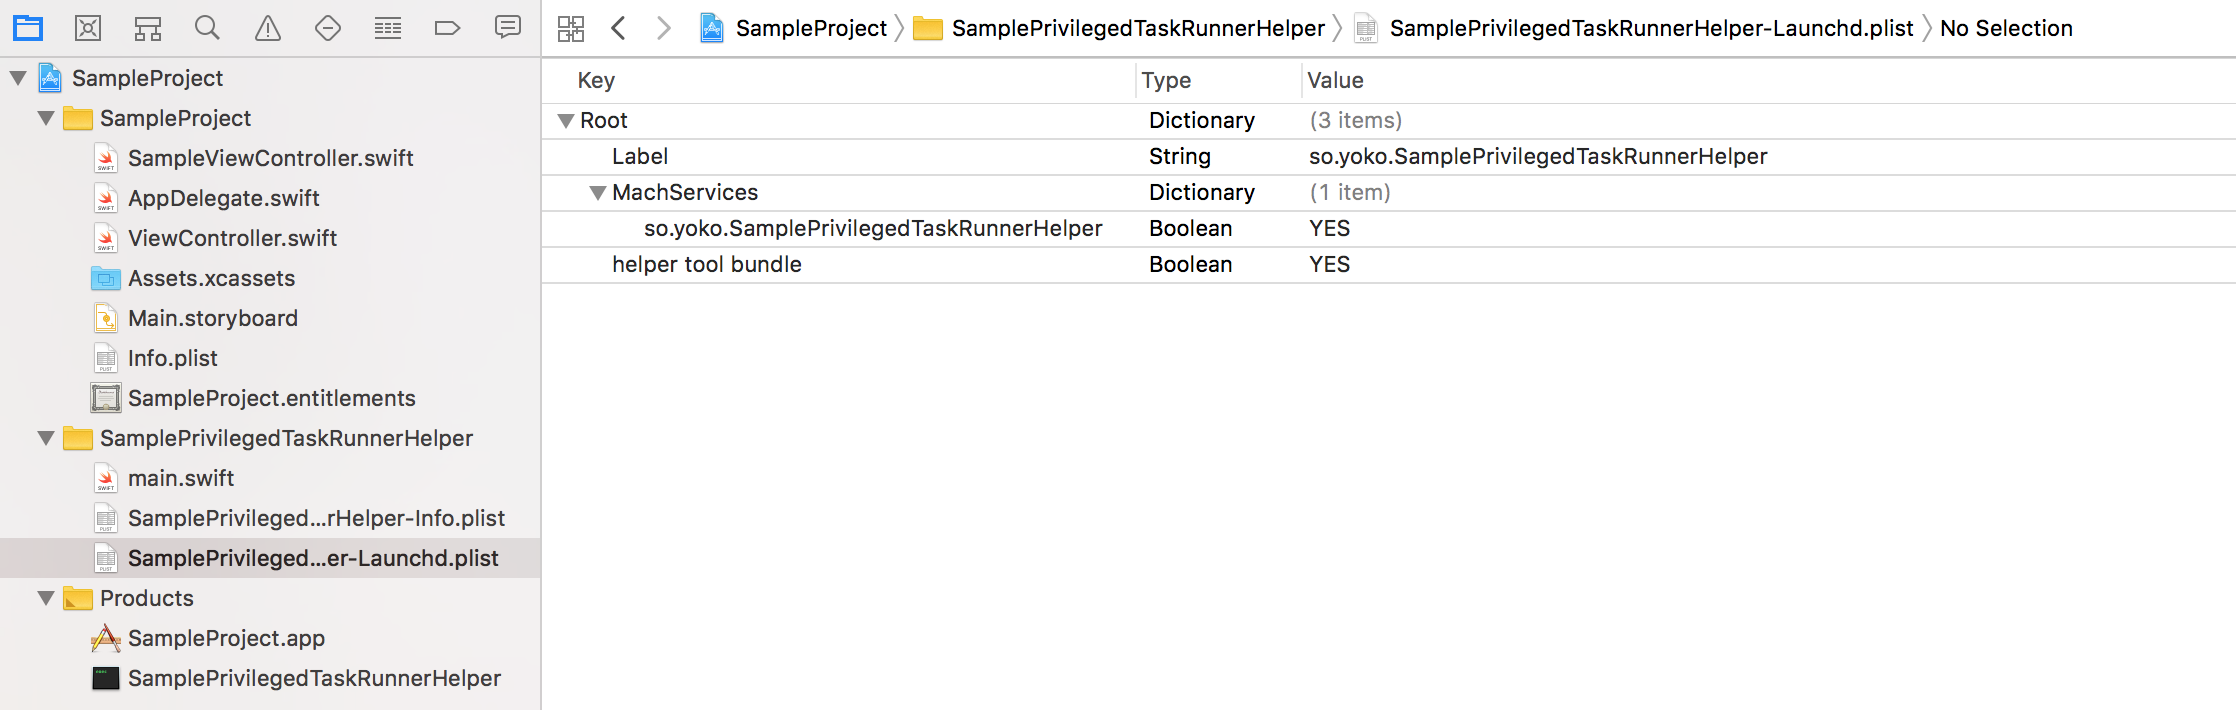
<?xml version="1.0" encoding="UTF-8"?>
<!DOCTYPE plist PUBLIC "-//Apple//DTD PLIST 1.0//EN" "http://www.apple.com/DTDs/PropertyList-1.0.dtd">
<plist version="1.0">
<dict>
	<key>Label</key>
	<string>so.yoko.SamplePrivilegedTaskRunnerHelper</string>
	<key>MachServices</key>
	<dict>
		<key>so.yoko.SamplePrivilegedTaskRunnerHelper</key>
		<true/>
	</dict>
	<key>helper tool bundle</key>
	<true/>
</dict>
</plist>
-Launchd.plist입니다. Label과 MachServices의 Key값을 Bundle Identifier에 알맞게 수정해주세요.
그리고 Boolean 타입의 Key들을 YES로 설정해주세요.

다음으로 좌측 네비게이션에서 프로젝트 선택 - TARGETS - SamplePrivilegedTaskRunnerHelper를 클릭합니다.
Identity에 Choose Info.plist File...버튼을 클릭하고 SamplePrivilegedTaskRunnerHelper-Info.plist 파일을 선택합니다.
Build Settings에 Other Linker Flags 세팅도 해줍니다.
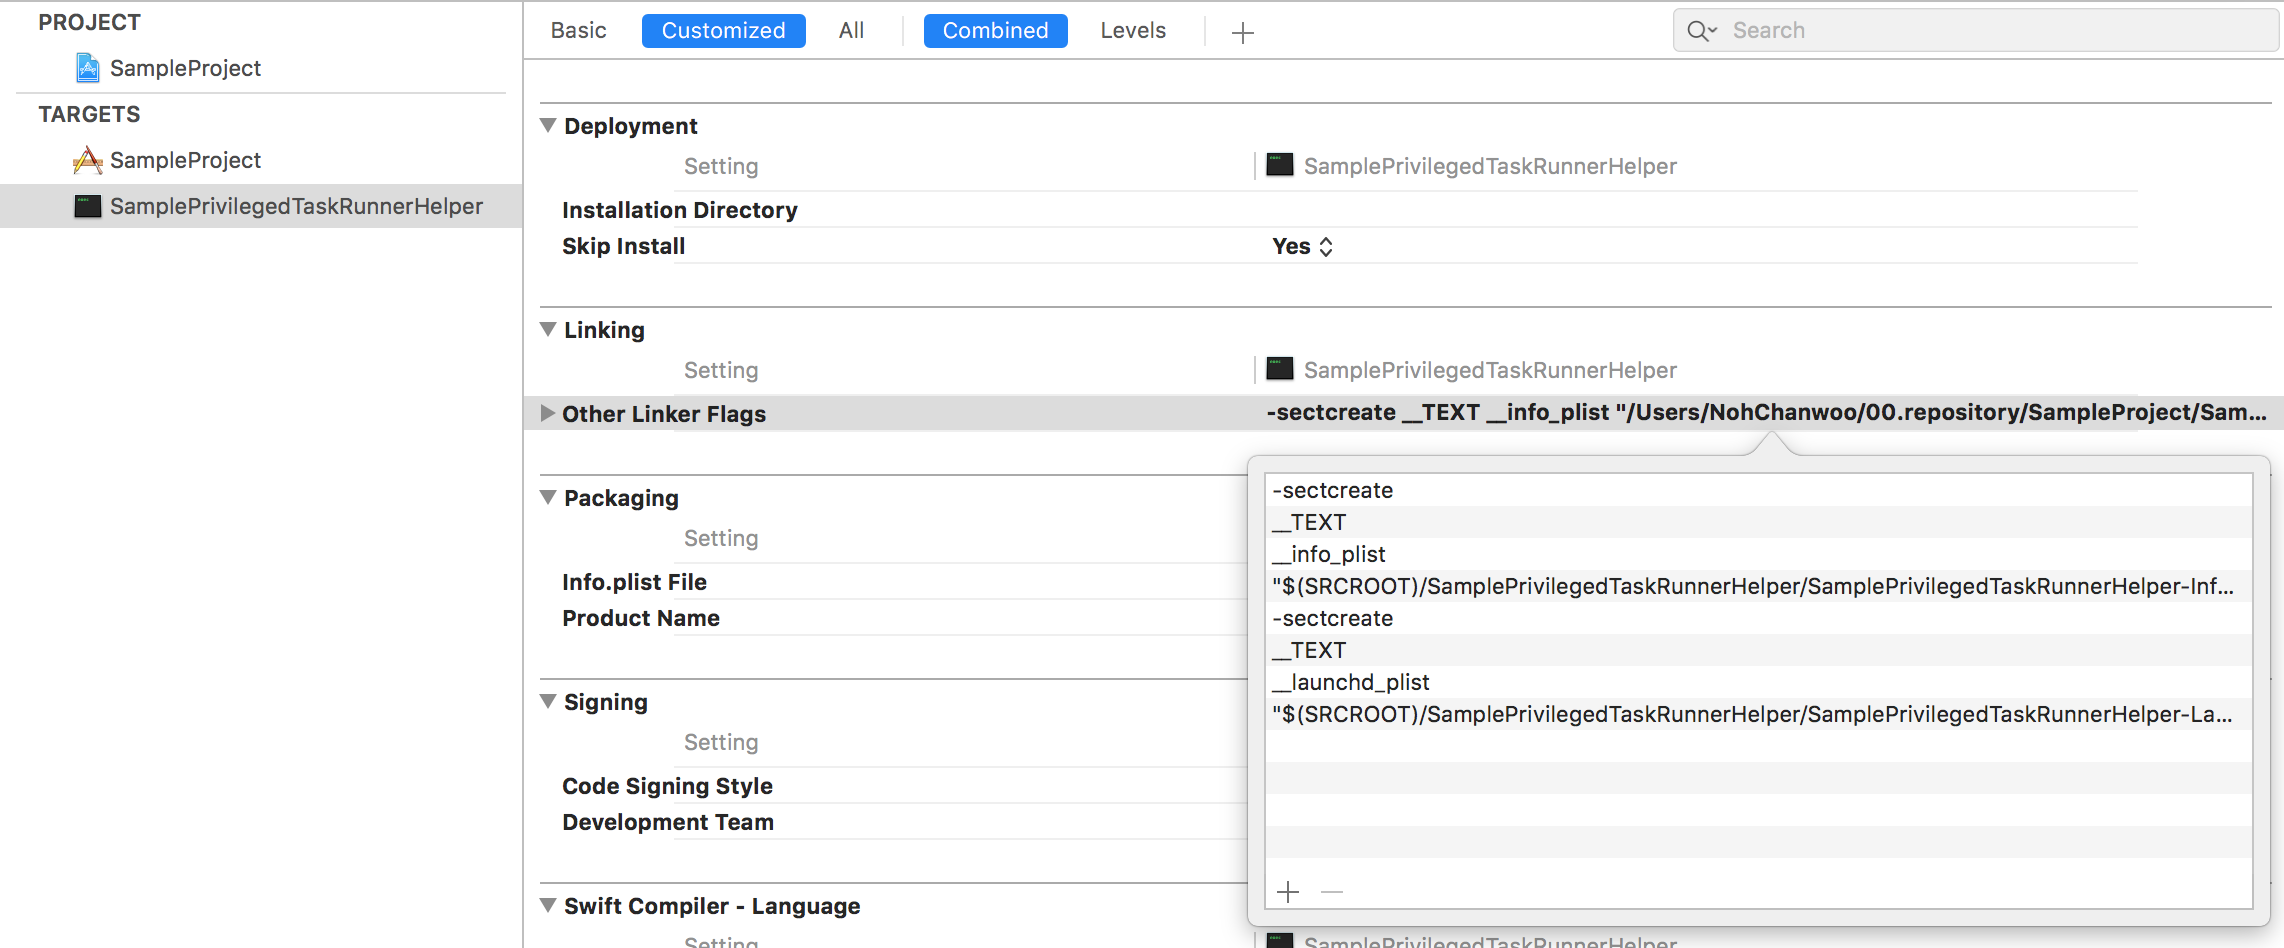
-sectcreate
__TEXT
__info_plist
"$(SRCROOT)/SamplePrivilegedTaskRunnerHelper/SamplePrivilegedTaskRunnerHelper-Info.plist"
-sectcreate
__TEXT
__launchd_plist
"$(SRCROOT)/SamplePrivilegedTaskRunnerHelper/SamplePrivilegedTaskRunnerHelper-Launchd.plist"
여기에 SamplePrivilegedTaskRunnerHelper부분은 본인이 설정한 이름으로 바꾸어 사용합니다.
그리고 Skip Install이 Yes로 되어있는지 확인해주세요.
TARGETS - SampleProject - Build Phases로 들어갑니다.
모서리에 있는 +버튼을 누르고 New Copy File Phase를 선택합니다. 그리고 다음와 같이 세팅해주세요.

Destination: Wrapper
Subpath: Contents/Library/LaunchServices
파일은 좌측 네비게이션의 Products에 있는 SamplePrivilegedTaskRunnerHelper를 드래그앤드랍 해주시면 됩니다.
여기까지 잘 따라와주셨다면 기본 세팅은 거의 끝난 셈입니다.
PrivilegedTaskRunnerHelper
SamplePrivilegedTaskRunnerHelper에 ProcessHelper.swift를 생성합니다.
TARGET은 SampleProject와 SamplePrivilegedTaskRunnerHelper 둘 다 체크합니다.
코드는
ProcessHelper.swift 그대로 활용합니다.
콘솔 명령어를 좀 더 쉽게 사용하고, 결과물을 반환받기 위한 클래스입니다.
그 다음으로 SamplePrivilegedTaskRunnerHelper에 RemoteProcessProtocol.swift을 생성합니다. 똑같이 TARGET을 SampleProject와 SamplePrivilegedTaskRunnerHelper 둘 다 체크합니다. 내용 코드 또한 LocalPortScanner의 RemoteProcessProtocol.swift와 같습니다만, machServiceName의 값을 자신의 HelperService의 Bundle Identifier로 설정합니다.
//
//  RemoteProcessProtocol.swift
//  ProcessRunnerExample
//
//  Created by Suolapeikko
//

import Foundation

struct HelperConstants {
    static let machServiceName = "so.yoko.SamplePrivilegedTaskRunnerHelper"
}

/// Protocol with inter process method invocation methods that ProcessHelper supports
/// Because communication over XPC is asynchronous, all methods in the protocol must have a return type of void
@objc(RemoteProcessProtocol)
protocol RemoteProcessProtocol {
    func getVersion(reply: (String) -> Void)
    func runCommand(path: String, authData: NSData?, reply: @escaping (String) -> Void)
    func runCommand(path: String, reply: @escaping (String) -> Void)
}
SamplePrivilegedTaskRunnerHelper의 main.swift에 다음의 코드를 추가해주세요.
let helper = PrivilegedTaskRunnerHelper()
helper.run()
마지막으로, SamplePrivilegedTaskRunnerHelper에 PrivilegedTaskRunnerHelper.swift를 생성합니다. 똑같이 TARGET을 SampleProject와 SamplePrivilegedTaskRunnerHelper 둘 다 체크합니다.
코드 또한 PrivilegedTaskRunnerHelper.swift와 같습니다.
권한 요청 생성
AppAuthorizationRights.swift라는 파일을 SampleProject(앱 타겟)에 만듭니다. AppAuthorizationRights에는 인증 요청 이름, 설명, 설정 등 권한 요청에 필요한 각종 상수들을 정의합니다.
import Foundation

struct AppAuthorizationRights {

    // Define all authorization right definitions this application will use (only one for this app)
    static let shellRightName: NSString = "so.yoko.sampleproject.runCommand"
    static let shellRightDefaultRule: Dictionary = shellAdminRightsRule
    static let shellRightDescription: CFString = "PrivilegedTaskRunner wants to run the command 'lsof -iTCP -sTCP:LISTEN -n -P'" as CFString

    // Set up authorization rules (only one for this app)
    static var shellAdminRightsRule: [String:Any] = ["class" : "user",
                                                     "group" : "admin",
                                                     "timeout" : 0,
                                                     "version" : 1]
}
SampleViewController에 다음과 같이 코드를 수정, 추가해주세요. 헬퍼 설치, 헬퍼 업데이트 체크, XPC세팅, 헬퍼 호출 등이 있습니다.
import Cocoa
import Security
import ServiceManagement
class SampleViewController: NSViewController {
var logArchive: String = ""
// NSXPC
var connection: NSXPCConnection?
var authRef: AuthorizationRef?
@IBOutlet var resultTextView: NSTextView!
override func viewDidLoad() {
super.viewDidLoad()
// Do view setup here.
resultTextView.string += logArchive
logArchive = ""
}
@IBAction func clickedRunButton(_ sender: Any) {
resultTextView.string = "rajephon.github.io"
}
func printLog(_ message:String) -> Void {
print(message)
if self.resultTextView != nil {
DispatchQueue.main.async {
self.resultTextView.string += "\n" + message
}
}else {
logArchive += "\n" + message
}
}
/// Initialize AuthorizationRef, as we need to manage it's lifecycle
func initAuthorizationRef() {
// Create an empty AuthorizationRef
let status = AuthorizationCreate(nil, nil, AuthorizationFlags(), &authRef)
if (status != OSStatus(errAuthorizationSuccess)) {
printLog("AppviewController: AuthorizationCreate failed")
return
}
}
/// Free AuthorizationRef, as we need to manage it's lifecycle
func freeAuthorizationRef() {
AuthorizationFree(authRef!, AuthorizationFlags.destroyRights)
}
/// Check if Helper daemon exists
func checkIfHelperDaemonExists() -> Bool {
var foundAlreadyInstalledDaemon = false
// Daemon path, if it is already installed
let helperURL = Bundle.main.bundleURL.appendingPathComponent("Contents/Library/LaunchServices/\(HelperConstants.machServiceName)")
let helperBundleInfo = CFBundleCopyInfoDictionaryForURL(helperURL as CFURL?)
if helperBundleInfo != nil {
foundAlreadyInstalledDaemon = true
}
return foundAlreadyInstalledDaemon
}
func installHelperDaemon() {
// Create authorization reference for the user
var authRef: AuthorizationRef?
var authStatus = AuthorizationCreate(nil, nil, [], &authRef)
// Check if the reference is valid
guard authStatus == errAuthorizationSuccess else {
printLog("AppviewController: Authorization failed: \(authStatus)")
return
}
// Ask user for the admin privileges to install the
var authItem = AuthorizationItem(name: kSMRightBlessPrivilegedHelper, valueLength: 0, value: nil, flags: 0)
var authRights = AuthorizationRights(count: 1, items: &authItem)
let flags: AuthorizationFlags = [[], .interactionAllowed, .extendRights, .preAuthorize]
authStatus = AuthorizationCreate(&authRights, nil, flags, &authRef)
// Check if the authorization went succesfully
guard authStatus == errAuthorizationSuccess else {
printLog("AppviewController: Couldn't obtain admin privileges: \(authStatus)")
return
}
// Launch the privileged helper using SMJobBless tool
var error: Unmanaged<CFError>? = nil
if(SMJobBless(kSMDomainSystemLaunchd, HelperConstants.machServiceName as CFString, authRef, &error) == false) {
let blessError = error!.takeRetainedValue() as Error
printLog("AppviewController: Bless Error: \(blessError)")
} else {
printLog("AppviewController: \(HelperConstants.machServiceName) installed successfully")
}
// Release the Authorization Reference
AuthorizationFree(authRef!, [])
}
/// Prepare XPC connection for inter process call
///
/// - returns: A reference to the prepared instance variable
func prepareXPC() -> NSXPCConnection? {
// Check that the connection is valid before trying to do an inter process call to helper
if(connection==nil) {
connection = NSXPCConnection(machServiceName: HelperConstants.machServiceName, options: NSXPCConnection.Options.privileged)
connection?.remoteObjectInterface = NSXPCInterface(with: RemoteProcessProtocol.self)
connection?.invalidationHandler = {
self.connection?.invalidationHandler = nil
OperationQueue.main.addOperation() {
self.connection = nil
self.printLog("AppviewController: XPC Connection Invalidated")
}
}
connection?.resume()
}
return connection
}
/// Compare app's helper version to installed daemon's version and update if necessary
func checkHelperVersionAndUpdateIfNecessary(callback: @escaping (Bool) -> Void) {
// Daemon path
let helperURL = Bundle.main.bundleURL.appendingPathComponent("Contents/Library/LaunchServices/\(HelperConstants.machServiceName)")
let helperBundleInfo = CFBundleCopyInfoDictionaryForURL(helperURL as CFURL)
if helperBundleInfo != nil {
let helperInfo = helperBundleInfo! as NSDictionary
let helperVersion = helperInfo["CFBundleVersion"] as! String
printLog("AppviewController: PrivilegedTaskRunner Bundle Version => \(helperVersion)")
// When the connection is valid, do the actual inter process call
let xpcService = prepareXPC()?.remoteObjectProxyWithErrorHandler() { error -> Void in
callback(false)
} as? RemoteProcessProtocol
xpcService?.getVersion(reply: {
installedVersion in
printLog("AppviewController: PrivilegedTaskRunner Helper Installed Version => \(installedVersion)")
callback(installedVersion == helperVersion)
})
}else {
callback(false)
}
}
/// Call Helper using XPC with authorization
func callHelperWithAuthorization() {
var authRefExtForm = AuthorizationExternalForm()
let timeout:Int = 5
// Make an external form of the AuthorizationRef
var status = AuthorizationMakeExternalForm(authRef!, &authRefExtForm)
if (status != OSStatus(errAuthorizationSuccess)) {
printLog("AppviewController: AuthorizationMakeExternalForm failed")
return
}
// Add all or update required authorization right definition to the authorization database
var currentRight:CFDictionary?
// Try to get the authorization right definition from the database
status = AuthorizationRightGet(AppAuthorizationRights.shellRightName.utf8String!, ¤tRight)
if (status == errAuthorizationDenied) {
print("errAuthorizationDenied")
var defaultRules = AppAuthorizationRights.shellRightDefaultRule
defaultRules.updateValue(timeout as AnyObject, forKey: "timeout")
status = AuthorizationRightSet(authRef!, AppAuthorizationRights.shellRightName.utf8String!, defaultRules as CFDictionary, AppAuthorizationRights.shellRightDescription, nil, "Common" as CFString)
printLog("AppviewController: : Adding authorization right to the security database")
}
// We need to put the AuthorizationRef to a form that can be passed through inter process call
let authData = NSData.init(bytes: &authRefExtForm, length:kAuthorizationExternalFormLength)
// When the connection is valid, do the actual inter process call
let xpcService = prepareXPC()?.remoteObjectProxyWithErrorHandler() { error -> Void in
self.printLog("AppviewController: XPC error: \(error)")
} as? RemoteProcessProtocol
xpcService?.runCommand(path: "lsof", authData: authData, reply: {
reply in
// Let's update GUI asynchronously
DispatchQueue.global(qos: .background).async {
// Background Thread
DispatchQueue.main.async {
// Run UI Updates
print("lsof -iTCP -sTCP:LISTEN -n -P\n\(reply)\n>-")
self.printToResult(data: reply)
}
}
})
}
func clearSecurity() {
// Remove this app's specific authorization information from the security database
let status = AuthorizationRightRemove(authRef!, AppAuthorizationRights.shellRightName.utf8String!)
if(status == errAuthorizationSuccess) {
print("AppviewController: AuthorizationRightRemove was successful")
}else {
print("AppviewController: AuthorizationRightRemove failed")
}
}
}
extension SampleViewController {
// MARK: Storyboard instantiation
static func freshController() -> SampleViewController {
//1.
let storyboard = NSStoryboard(name: NSStoryboard.Name(rawValue: "Main"), bundle: nil)
//2.
let identifier = NSStoryboard.SceneIdentifier(rawValue: "SampleViewController")
//3.
guard let viewcontroller = storyboard.instantiateController(withIdentifier: identifier) as? SampleViewController else {
fatalError("Why cant i find SampleViewController? - Check Main.storyboard")
}
return viewcontroller
}
}
메소드 설명
func checkIfHelperDaemonExists() -> Bool
헬퍼 데몬 존재 여부를 검사합니다. 상단의 SampleProject 타겟의 Build Phases에서 Copy Files에 세팅한 디렉토리에 서비스네임의 파일이 존재하는지 확인합니다.
func installHelperDaemon()
헬퍼 데몬을 설치합니다. 한 번 설치하면, 헬퍼 데몬을 수정해도, installHelperDaemon이 다시 동작하기 전에는 사용 버전이 변동되지 않으니 주의 바랍니다.
func prepareXPC() -> NSXPCConnection?
헬퍼와 통신을 위한 커넥션을 세팅합니다.
func checkHelperVersionAndUpdateIfNecessary(callback: @escaping (Bool) -> Void)
헬퍼를 새로 설치해야 하는지 확인합니다. 설치되어있지 않거나, 버전이 업데이트 되었을 경우 callback 파라미터가 true로 반환됩니다.
func callHelperWithAuthorization()
XPC와 authorization을 이용하여 헬퍼를 호출합니다. 권한 상승을 요청하고 XPC로 헬퍼에서 명령어를 수행합니다.
앱이 실행될 경우 헬퍼의 업데이트나 설치가 필요할 경우, installHelperDaemon를 호출하여 설치하고, 인증 세팅을 할 수 있도록 합니다. AppDelegate에 다음과 같이 코드를 수정, 추가해주세요.
import Cocoa

@NSApplicationMain
class AppDelegate: NSObject, NSApplicationDelegate {

    let statusItem = NSStatusBar.system.statusItem(withLength:NSStatusItem.squareLength)
    let popover = NSPopover()

    var viewController: SampleViewController!

    func applicationDidFinishLaunching(_ aNotification: Notification) {
        // Insert code here to initialize your application
        if let button = statusItem.button {
            button.image = NSImage(named:NSImage.Name("StatusBarButtonImage"))
            button.action = #selector(togglePopover(_:))
        }

        viewController = SampleViewController.freshController()
        popover.contentViewController = viewController
        popover.behavior = NSPopover.Behavior.semitransient

        viewController.checkHelperVersionAndUpdateIfNecessary { installed in
            if !installed {
                self.viewController.installHelperDaemon()
            }
            // Create an empty authorization reference
            self.viewController.initAuthorizationRef()
        }

        if !popover.isShown {
            showPopover(sender: self)
        }
    }

    func applicationWillTerminate(_ aNotification: Notification) {
        // Insert code here to tear down your application
        viewController.freeAuthorizationRef()
    }

    @objc func togglePopover(_ sender: Any?) {
        if popover.isShown {
            closePopover(sender: sender)
        } else {
            showPopover(sender: sender)
        }
    }

    func showPopover(sender: Any?) {
        if let button = statusItem.button {
            popover.show(relativeTo: button.bounds, of: button, preferredEdge: NSRectEdge.minY)
        }
    }

    func closePopover(sender: Any?) {
        popover.performClose(sender)
    }
}
func applicationWillTerminate(_ :Notification)가 호출될 때 freeAuthorizationRef처리를 할 수 있도록 viewController를 클래스 멤버변수로 선언합니다. 그리고 func applicationDidFinishLaunching(_ :Notification)에서 헬퍼 데몬을 업데이트 하거나 설치하는 과정 추가합니다.
SMJobBlessUtil.py
SMJobBlessUtil은 코드 서명 등 SMJobBless사용을 위한 세팅을 확인하고 정정하는 역할을 합니다.
SMJobBlessUtil.py는 애플 Documentation Archive(SMJobBlessUtil.py)에서 다운로드할 수 있습니다.
사용법은 다음과 같습니다. 터미널에서 다음 명령을 수행합니다.
python ./SMJobBlessUtil.py setreq <메인 타겟 .app 파일> <메인 타겟 Info.plit> <헬퍼-Info.plist>
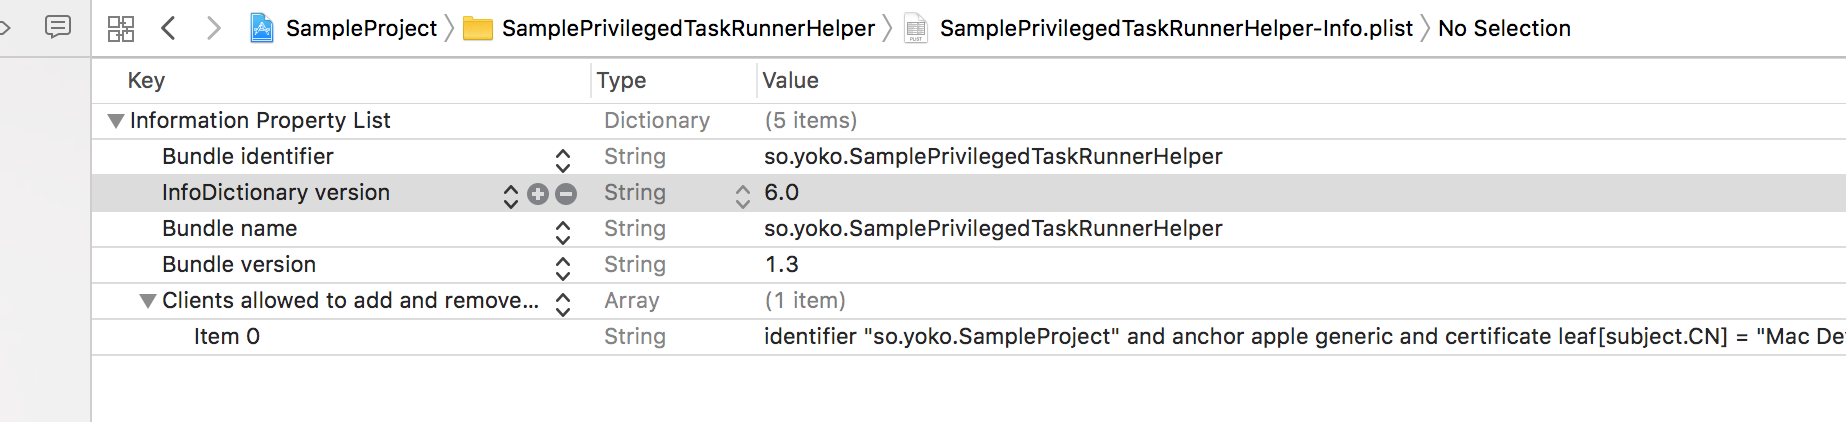
작업이 정상적으로 완료될 경우, 다음과 같이 Info.plist의 Clients allowed to add and remove tool Key에 값이 자동적으로 세팅이 되어있습니다.
이제 진짜 마지막입니다.
RUN버튼을 클릭할 경우, 권한상승요청을 할 수 있도록 SampleViewController.swift에서 func clickedRunButton(_ sender: Any)를 다음과 같이 수정합니다.
@IBAction func clickedRunButton(_ sender: Any) {
    callHelperWithAuthorization()
}
실행
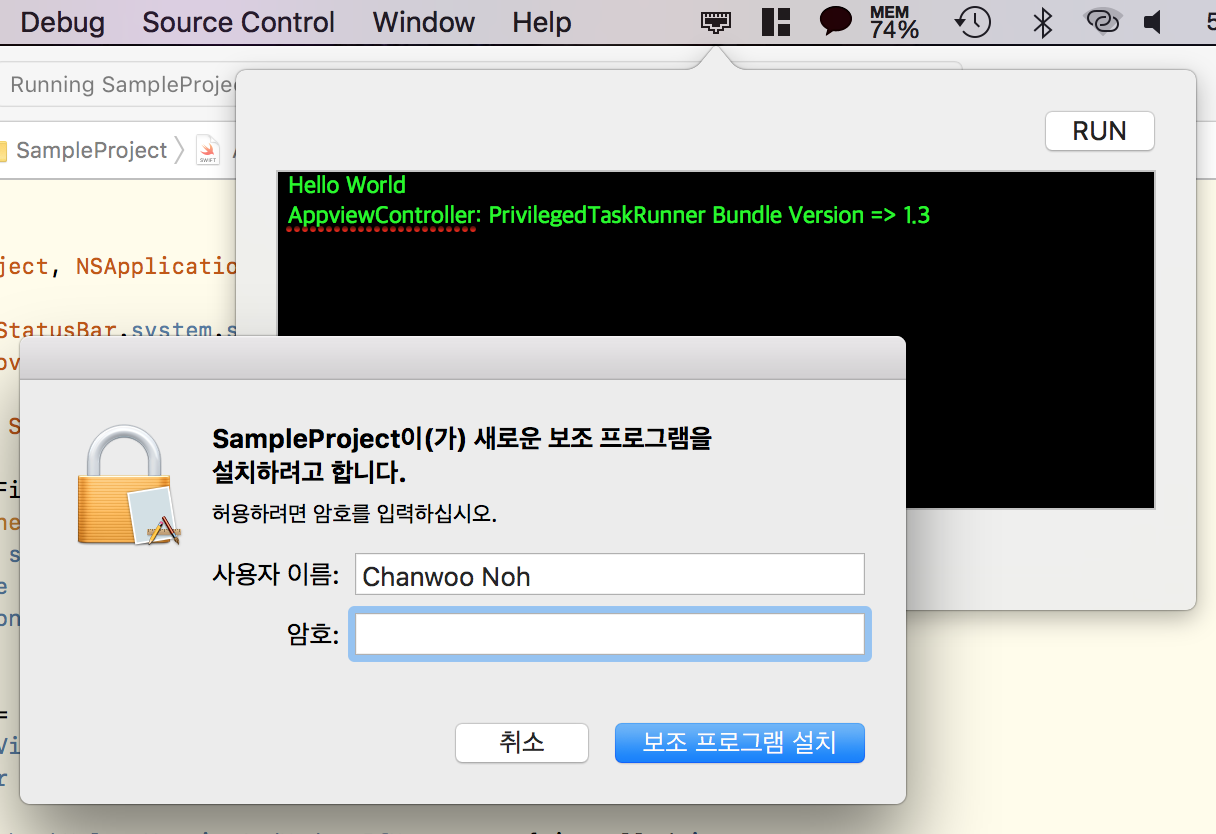
정상적으로 첫 실행될 경우, 아직 헬퍼가 설치되어있지 않아 AppDelegate.swift의 viewController.checkHelperVersionAndUpdateIfNecessary에서 installed가 false로 반환됩니다. 이에따라 self.viewController.installHelperDaemon()가 수행되어 헬퍼를 설치하기 위해 다음과 같은 설치 허용 요청 창이 나타납니다.
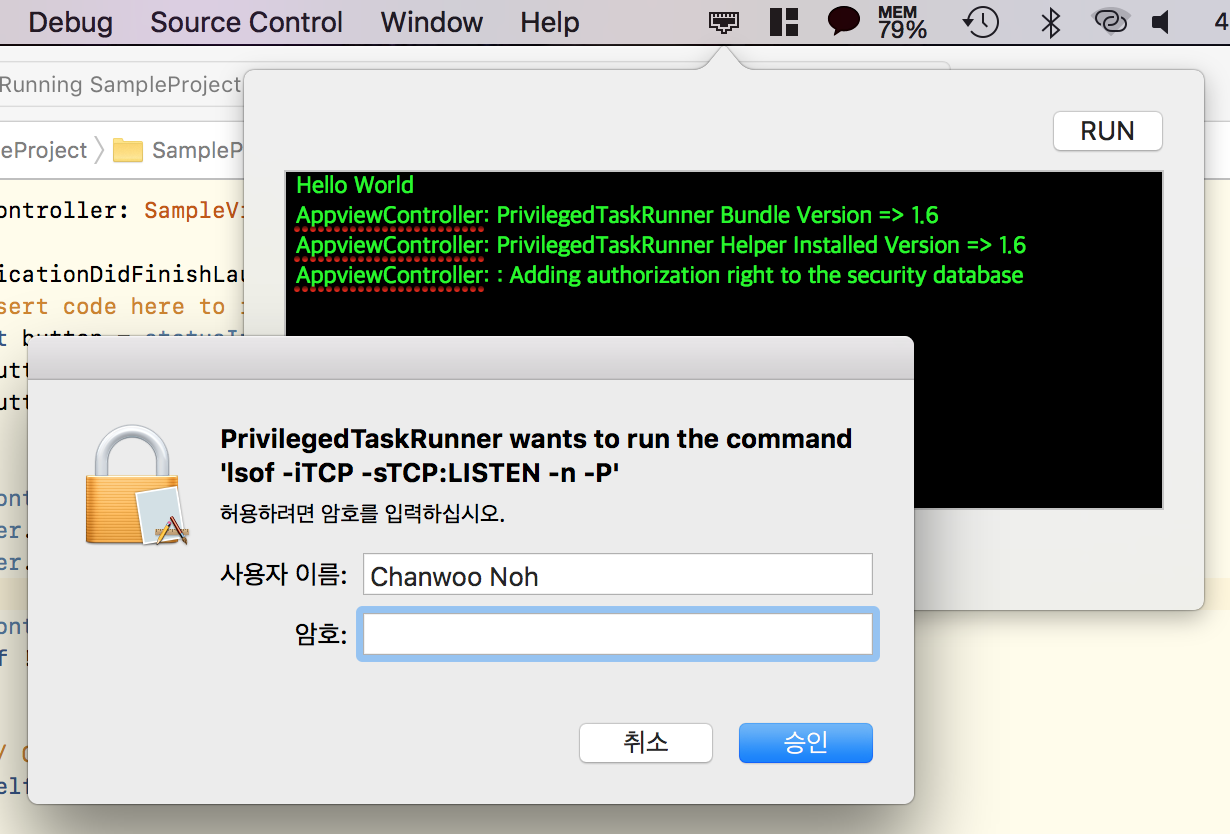
RUN버튼을 눌러주면, AppAuthorizationRights.swift파일의 shellRightDescription 스태틱 상수에 설정한 문구가 나타나며 권한을 요청합니다.
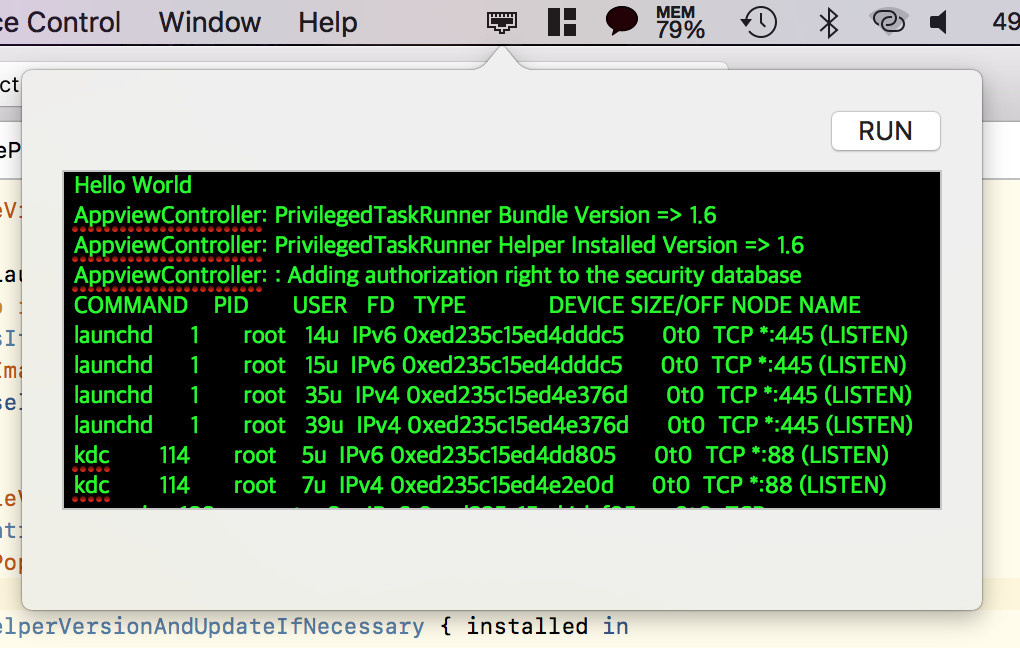
정상적인 패스워드를 입력할 경우, PrivilegedTaskRunnerHelper의 func runCommand(path: String, authData: NSData?, reply: @escaping (String) -> Void)가 수행되고 결과가 텍스트필드에 나타납니다.
원래 SampleViewController.swift의 callHelperWithAuthorization()에서 xpcService?.runCommand를 호출할 때 첫번째 파라미터(path: "lsof")를 명령어로 전달하지만 여러 명령어를 수행하지 않고, 명령어의 아규먼트 전달 편의성을 위해 PrivilegedTaskRunnerHelper의 멤버 상수(commandPath:String, commandArguments:[String])로 정의하여 사용했습니다.
기타 문제 발생 시 대응 방법
PrivilegedTaskRunnerHelper가 수정이 적용되질 않는 것 같습니다.
PrivilegedTaskRunnerHelper의 버전을 올리고 다시 빌드 후 실행해보세요. 번거로울 경우 AppDelegate에서 self.viewController.installHelperDaemon()를 viewController.checkHelperVersionAndUpdateIfNecessary블럭 밖으로 빼주세요. 그럴 경우, 매 실행 마다 재설치되므로 같은 버전이더라도 수정이 적용되는 것을 볼 수 있습니다.
앱 실행 후 AppviewController: PrivilegedTaskRunner Bundle Version => 1.3 만 출력되고 설치 알림이 뜨지도 않고 가만히 있습니다.
헬퍼에게서 응답이 오지 않는 것입니다. SamplePrivilegedTaskRunnerHelper의 main.swift에 다음의 코드가 정상적으로 작동 중인지 확인이 필요합니다.
let helper = PrivilegedTaskRunnerHelper()
helper.run()
AuthorizationCreate returns error code -60005 에러가 발생합니다.
App Target의 Capabilities에 App Sandbox가 ON 상태인지 확인해주세요. ON일 경우 OFF로 바꾸고 다시 빌드해봅시다.
Error Domain=CFErrorDomainLaunchd Code=4 "(null)" 에러가 발생합니다.
App Target의 Info.plist의 Tools owned after installation 혹은 Helper target의 Info.plist의 Clients allowed to add and remove tool의 값이 잘못 설정되었습니다. SMJobBlessUtil.py를 다시 수행한 다음 빌드 바랍니다.
./SMJobBlessUtil.py 수행 중 에러가 발생합니다.
python ./SMJobBlessUtil.py setreq '/...some path.../Build/Products/Debug/SampleProject.app' '/...some path.../repository/SampleProject/SampleProject/Info.plist' '/...some path.../repository/SampleProject/SamplePrivilegedTaskRunnerHelper/SamplePrivilegedTaskRunnerHelper-Info.plist'
Traceback (most recent call last):
  File "./SMJobBlessUtil.py", line 424, in <module>
    main()
  File "./SMJobBlessUtil.py", line 418, in main
    setreq(appArgs[1], appArgs[2], appArgs[3:])
  File "./SMJobBlessUtil.py", line 360, in setreq
    appToolDict[bundleID] = toolNameToReqMap[bundleID]
KeyError: 'so.yoko.SamplePrivilegedTaskRunnerHelper'
다음과 같은 에러가 발생하는 경우는 Helper의 Product Name이 Product Bundle Identifier와 일치하지 않는 경우 발생한다.
SamplePrivilegedTaskRunnerHelper의 Build Settings에서 Product Name을 so.yoko.SamplePrivilegedTaskRunnerHelper로 세팅해주면 해결됩니다.
그리고 다시 Cmd + Shift + K로 클린 후 헬퍼와 메인 앱을 다시 빌드하고 명령어를 수행합니다.
Reference
Github suolapeikko / PrivilegedTaskRunner
https://developer.apple.com/library/…/SMJobBlessUtil_py.html
https://gist.github.com/jadeatucker/5382343
http://www.4d.com/jp/blog/mavericks-and-purge.html